Sunday, October 27, 2013

Basic setup for Microsoft Remote Desktop and Remote Desktop Client for Android


Setup in the video:
- Windows 8.1 Pro running on a slow and outdate Netbook, BenQ Joybook Lite U101 with Aton N270, connect router with cable.
- HTC One X running Android 4.2.2, connect via WiFi.
- HTC Fly running Android 3.2.1, connect via WiFi.


Before establish connection between host PC and remote client app, you have to setup in both PC side and client side.

Set up your Remote Desktop in host PC. (This example running Windows 8.1 Pro)

- Enter "Remote Desktop" in Search, select "Select users who can use remote desktop".


- Under Remote tab, enable "Allow remote connections to this computer" under Remote Desktop. Click the "Select Users" button.


remark: what type of connection should be allowed?

Network Level Authentication (NLA) is an authentication method that completes user authentication before you establish a full connection and the sign-in screen appears. This can help protect the remote PC from hackers and malware.
  • To prevent anyone from connecting to your PC using Remote Desktop or RemoteApp and Desktop Connections, pick Don’t allow remote connections to this computer.
  • If you don't know which version of Remote Desktop Connection other people are using, pick Allow remote connections to this computer.
  • If you know that the people who will connect to your PC are running Windows 7 or Windows 8 on their PCs, check the Only allow connections from computers running Remote Desktop with Network Level Authentication (recommended) box.
Reference: What types of Remote Desktop connections should I allow?

- Click "Add" button.


- Select "Users" in Select the object type. Enter object name and click "Check Names", to get the selected object.


- OK.


- and OK.


 Install and start "Microsoft Remote Desktop" for Android.

Set up your Remote Desktop Client in Android side.

- Select "Remote Desktops" and click the "+".


- Enter Connection, IP address in PC name, User name and Password. And click the check mark on upper-right.


Read the Official FAQ.

Project Shield - Using Google's infrastructure to protect freedom of expression

Project Shield is an initiative to use Google's infrastructure to protect free expression online. The service currently combines Google's DDoS mitigation technologies and Page Speed Service (PSS), which allow websites to serve their content through Google to be better protected from DDoS attacks. The service is currently seeking 'trusted testers' and people with sites that serve media, elections and human rights-related content are invited to apply for an invite atg.co/projectshield

Getting Started with Remote Desktop Client on mobile

Microsoft release Remote Desktop Client for Android and iOS recently. Users can use the Microsoft Remote Desktop Client to connect to a remote PC and your work resources from almost anywhere.

Download here:
for Android from Google Play
for iOS from iTune


***To establish connection between Microsoft Remote Desktop Client to connect between remote PC, you have to do some setup. Refer to the document: Microsoft Remote Desktop Clients.

Sharpen bitmap using Convolution

The previous exercise "Blur bitmap using Convolution". By changing the matrix of Convolution class, we can use it to sharpen bitmap.

 class Convolution {

  // matrix to sharpen image
  int[][] matrix = { { 0, -1, 0 }, { -1, 5, -1 }, { 0, -1, 0 } };
  ...


Sharpen bitmap using Convolution

Very nice intro at updated Google Maps Android API v2 documentation page

Google Maps Android API v2 documentation page updated with very nice interactive intro:)


Google Maps Android API v2 documentation page


Visit: https://developers.google.com/maps/documentation/android/

Blur bitmap using Convolution

The previous exercise blur bitmap by averaging pixels with surrounding pixels. In this exercise, we are going to implement a class of Convolution, to blur bitmap with Convolution Matrix.
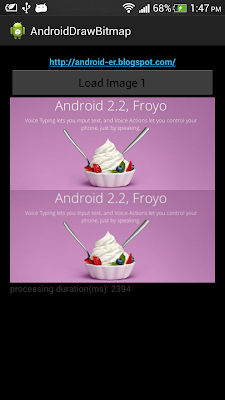
Blur bitmap using Convolution


package com.example.androiddrawbitmap;

import java.io.FileNotFoundException;

import android.net.Uri;
import android.os.Bundle;
import android.app.Activity;
import android.content.Intent;
import android.graphics.Bitmap;
import android.graphics.BitmapFactory;
import android.graphics.Canvas;
import android.graphics.Color;
import android.view.View;
import android.view.View.OnClickListener;
import android.widget.Button;
import android.widget.ImageView;
import android.widget.TextView;

public class MainActivity extends Activity {

 Button btnLoadImage;
 ImageView imageResult, imageOriginal;
 TextView textDur;

 final int RQS_IMAGE1 = 1;

 Uri source;
 Bitmap bitmapMaster;
 Canvas canvasMaster;

 @Override
 protected void onCreate(Bundle savedInstanceState) {
  super.onCreate(savedInstanceState);
  setContentView(R.layout.activity_main);

  btnLoadImage = (Button) findViewById(R.id.loadimage);
  imageResult = (ImageView) findViewById(R.id.result);
  imageOriginal = (ImageView) findViewById(R.id.original);
  textDur = (TextView) findViewById(R.id.dur);

  btnLoadImage.setOnClickListener(new OnClickListener() {

   @Override
   public void onClick(View arg0) {
    Intent intent = new Intent(
      Intent.ACTION_PICK,
      android.provider.MediaStore.Images.Media.EXTERNAL_CONTENT_URI);
    startActivityForResult(intent, RQS_IMAGE1);
   }
  });
 }

 @Override
 protected void onActivityResult(int requestCode, int resultCode, Intent data) {
  super.onActivityResult(requestCode, resultCode, data);

  if (resultCode == RESULT_OK) {
   switch (requestCode) {
   case RQS_IMAGE1:
    source = data.getData();

    try {
     bitmapMaster = BitmapFactory
       .decodeStream(getContentResolver().openInputStream(
         source));

     imageOriginal.setImageBitmap(bitmapMaster);
     loadBlurBitmap(bitmapMaster);

    } catch (FileNotFoundException e) {
     e.printStackTrace();
    }

    break;
   }
  }
 }

 private void loadBlurBitmap(Bitmap src) {
  if (src != null) {

   Bitmap bmBlur;
   Convolution convolution = new Convolution();

   long startTime = System.currentTimeMillis();
   bmBlur = convolution.convBitmap(src);
   long duration = System.currentTimeMillis() - startTime;

   imageResult.setImageBitmap(bmBlur);
   textDur.setText("processing duration(ms): " + duration);
  }
 }

 class Convolution {

  // matrix to blur image
  int[][] matrix = { { 1, 1, 1 }, { 1, 1, 1 }, { 1, 1, 1 } };
  // kernal_width x kernal_height = dimension pf matrix
  // halfWidth = (kernal_width - 1)/2
  // halfHeight = (kernal_height - 1)/2
  int kernal_width = 3;
  int kernal_height = 3;
  int kernal_halfWidth = 1;
  int kernal_halfHeight = 1;

  public Bitmap convBitmap(Bitmap src) {

   int[][] sourceMatrix = new int[kernal_width][kernal_height];

   // averageWeight = total of matrix[][]. The result of each
   // pixel will be divided by averageWeight to get the average
   int averageWeight = 0;
   for (int i = 0; i < kernal_width; i++) {
    for (int j = 0; j < kernal_height; j++) {
     averageWeight += matrix[i][j];
    }
   }
   if (averageWeight == 0) {
    averageWeight = 1;
   }

   int pixelR, pixelG, pixelB, pixelA;

   int w = src.getWidth();
   int h = src.getHeight();
   Bitmap bm = Bitmap.createBitmap(w, h, Bitmap.Config.ARGB_8888);

   // fill sourceMatrix with surrounding pixel
   for (int x = 0; x < w; x++) {
    for (int y = 0; y < h; y++) {

     for (int xk = 0; xk < kernal_width; xk++) {
      for (int yk = 0; yk < kernal_height; yk++) {
       int px = x + xk - kernal_halfWidth;
       int py = y + yk - kernal_halfHeight;

       if (px < 0) {
        px = 0;
       } else if (px >= w) {
        px = w - 1;
       }

       if (py < 0) {
        py = 0;
       } else if (py >= h) {
        py = h - 1;
       }

       sourceMatrix[xk][yk] = src.getPixel(px, py);

      }
     }

     pixelR = pixelG = pixelB = pixelA = 0;

     for (int k = 0; k < kernal_width; k++) {
      for (int l = 0; l < kernal_height; l++) {

       pixelR += Color.red(sourceMatrix[k][l])
         * matrix[k][l];
       pixelG += Color.green(sourceMatrix[k][l])
         * matrix[k][l];
       pixelB += Color.blue(sourceMatrix[k][l])
         * matrix[k][l];
       pixelA += Color.alpha(sourceMatrix[k][l])
         * matrix[k][l];
      }
     }
     pixelR = pixelR / averageWeight;
     pixelG = pixelG / averageWeight;
     pixelB = pixelB / averageWeight;
     pixelA = pixelA / averageWeight;

     if (pixelR < 0) {
      pixelR = 0;
     } else if (pixelR > 255) {
      pixelR = 255;
     }

     if (pixelG < 0) {
      pixelG = 0;
     } else if (pixelG > 255) {
      pixelG = 255;
     }

     if (pixelB < 0) {
      pixelB = 0;
     } else if (pixelB > 255) {
      pixelB = 255;
     }

     if (pixelA < 0) {
      pixelA = 0;
     } else if (pixelA > 255) {
      pixelA = 255;
     }

     bm.setPixel(x, y,
       Color.argb(pixelA, pixelR, pixelG, pixelB));
    }
   }

   return bm;
  }
 }
}


Keep using layout in the post Blur bitmap.

download filesDownload the files.

download filesDownload and try the APK.

USB On the Go, for HTC


If your Android support USB OTG, you can access USB Storage via USB OTG cable. (Please notice that not all devices support this feature)

Here is a post describe using of USB On the Go for HTC device from HTC Blog: http://blog.htc.com/usb-otg/

  • First, get your USB OTG cable ready
  • Plug your USB drive into the USB port on the cable, then plug the cable into your phones microUSB port.
  • Now you can access the data on your USB drive through your HTC smartphone. Using USB OTG, you can use apps like Gallery, Music and Polaris Office to easily access files on your USB drive and your smartphone.
  • When you’re done, you can quickly check available storage on your USB drive by going to Setting > Storage on your HTC phone.  Also, don’t forget to unmount your USB drive when you’re finished.